Have you ever wondered what to do with all those empty wine and beer bottles? How about making glasses out of them. Today a couple of my friends and I made glasses out of bottles. This is how we did it.
First you must make sure you have all the labels off of your bottles. I have found the best way to do this is to soak your bottles in hot water. Then peel or scrape off the labels.(Please be careful while doing this project.)
If there is still sticky stuff on your bottle put a small amount of Goof Off on the sticky part of the bottle and rub it off with a paper towel. Rinse your bottle. You will now want to use a Brillo pad to gently rub off the residue from the Goof Off. Rinse and dry your bottle.
Before we start cutting, fill your tea pot up with water and place it on the stove to boil. While you are waiting for your water to boil you can start cutting your bottles.
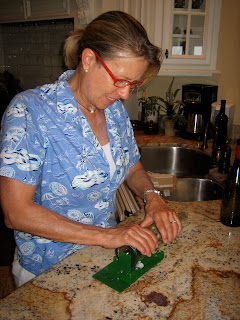
Place your bottle onto the bottle cutter. Using both hands, gently but firmly rotate your bottle, like you see Stephanie doing in the picture above. You will hear a scratching noise,this is good thing. When you hear a pop,stop turning the bottle,this is an indication your bottle is etched all the way round. Set your bottle a side. Now you need your tea pot with boiling water.
Place your bottle in the sink. Turn your water on cold, you want a slow and steady flow of water coming out of your faust. With your left hand,hold your wine bottle,rotating the bottle slowly. At the same time you want to slowly pore your boiling water just over your etched line. Rotate the bottle about three times. Put down your tea pot. Place your bottle under the cold water, keep rotating your bottle. Your bottle should pop in half, leaving you with a glass.( You may have to do the hot water ,cold water twice.)
Now it is time to finish your glass. Start with a glass with a clean cut. If your edges are not clean, don't waist your time,throw your glass away. Once you have a glass with a clean edge,you will need a polishing compound. Put the compound on a flat glass plate. Wet the top of your glass. Put your glass on top of the plate and twist your glass in circles. You will hear a chalkboard grounding sound. Keep on turning your glass until the top of your glass is smooth and etched.
After your top edge so smooth you will need a fine wet-dry sandpaper. Rub this sandpaper around the top edges of your glass several times. To finish this project you can use a dermal sander around the edges,like Colleen is showing you here.
Colleen and Stephanie enjoying a wonderful day of crafting.
Stephanie used the dermal and added a little etching.
This is a great project. If you think you would like to try bottle cutting, here are some resources you may find helpful. You tube, bottle cutting, the green power science is the best video. Delphi sells a bottle cutter kit that works great.delphiglass.com Keep on crafting!


No comments:
Post a Comment